

beasty-visual-novel / getting-started / your-first-scene.md
Your first scene
From an empty Unity project to a scene you can press Play on: a backdrop, a character who says two lines, and a choice that branches. You will not write a single line of code, and it takes about ten minutes.
Before you start, make sure the package is imported and the Tools > Beasty VN menu exists. See Installation.
1. Build the scene
Create or open a scene, then run:
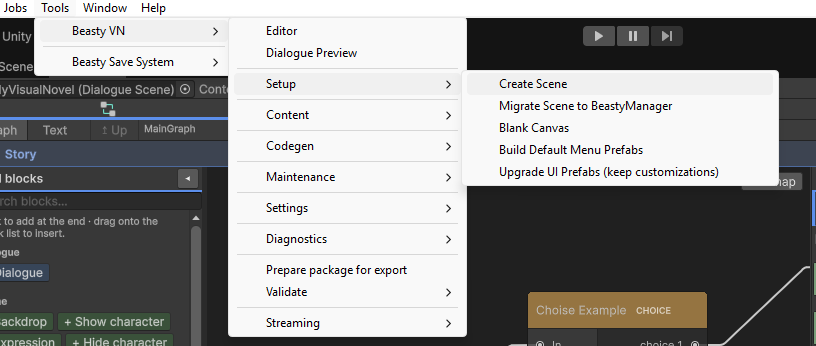
Tools > Beasty VN > Setup > Create SceneThis builds the whole rig for you. When it finishes you have five objects in the Hierarchy:
| Object | What it is |
|---|---|
| BeastyManager | The one object that runs everything. Every manager lives inside it as a hidden sub-component. |
| Stage | Where the backdrop, the characters and the props are drawn. It also carries the free-roam scenario. |
| Canvas | The entire UI, from the VN_Canvas prefab: dialogue box, choices, main menu, game menu, save/load, preferences, history, credits, help, and the loading screen. |
| Main Camera | An orthographic camera, if the scene did not already have one. |
| EventSystem | So the UI receives clicks. The right input module is installed at startup, whichever input backend your project uses. |
Then it auto-wires: every reference the scene needs is resolved for you.
Create Scene is safe to re-run. It reuses the camera, the EventSystem and the canvas that are already there instead of duplicating them, and auto-wire only fills empty references — it never overwrites your wiring. If a scene ever comes up broken, running it again is the first thing to try.

2. Get the assets
Create Scene also creates the data assets your scene needs, and asks you where to save them. If it did not ask (because you already had assets), or you want to do this step on its own, run:
Tools > Beasty VN > Content > Create Base Assets (intro + FreeRoam map)It creates only what is missing, wires it in, and never duplicates or overwrites anything. If you want
a story project and nothing else — no free-roam map — use Tools > Beasty VN > Setup > Blank Canvas
instead. Either way you end up with a small family of assets. Four of them are the ones to understand:
| Asset | What it is |
|---|---|
DialogueScene (named intro) | One story. This is the root asset — the thing you open in the editor and the thing the game plays. |
| VNContext | The one shared world: the cast, the variables, the dictionary, the items, the quests, the screens. Every DialogueScene in your game shares it. There is only ever one. |
| StoryGraph | The canvas your nodes live on. It comes with one Dialogue node already in it, marked as the entry node — that is where playback starts. |
| LocalizationTable | Every line of text in the story, keyed, one column per language. Your dialogue lives here even if you never translate it. |
The StoryGraph and its first node live inside the intro asset, so you will not see them as separate
files. The rest of the family is support you will meet later: a music config (intro_Music), a
character-variable schema (intro_CharacterVariables), the FreeRoam map (freeroammapscheme) and a
VNSettings asset in Resources.
If those names mean nothing to you yet, that is fine — keep going, and read Core concepts afterwards.
3. Open the editor
Tools > Beasty VN > EditorThe Beasty VN window opens with your DialogueScene already in the top-bar field. Nine tabs across the top. You need two of them today: Characters and Story. For the rest, see the Editor tour.
4. Create a character
Go to the Characters tab, Cast sub-tab.
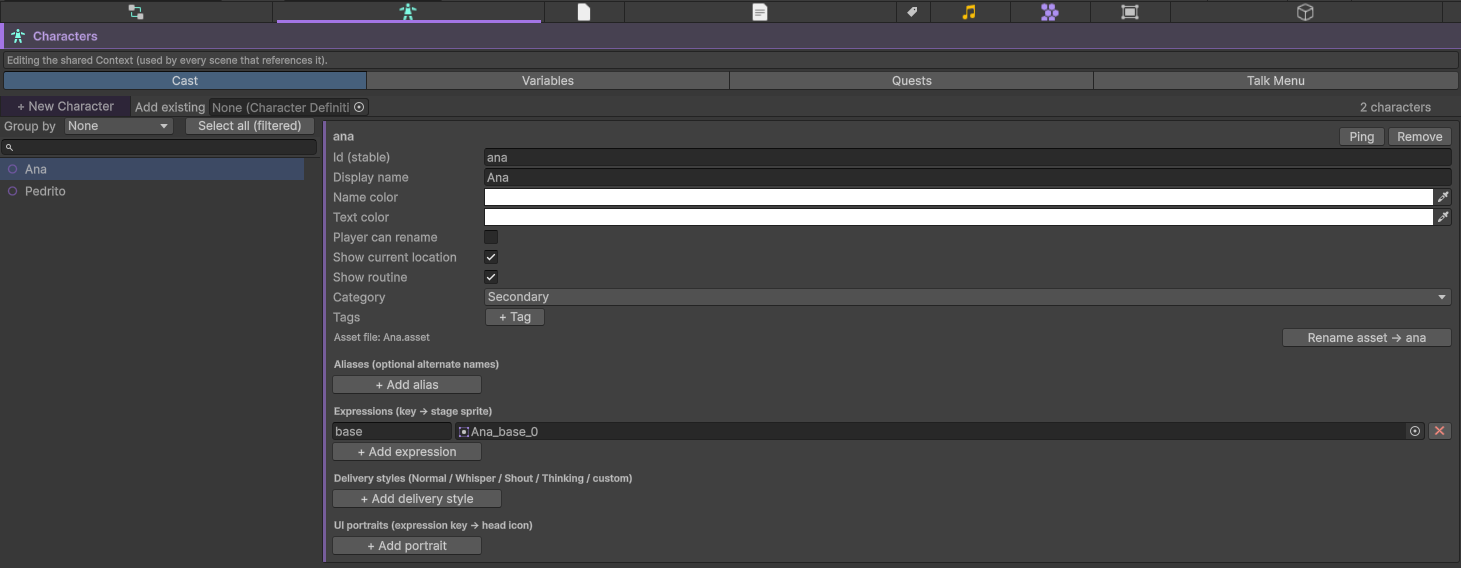
- Press + New Character. Choose where to save it. The character appears in the list on the left and opens on the right.
- Id (stable) — the internal name the story uses to refer to this character, for example
juan. It is seeded from the asset name. Everything that mentions this character mentions this id, so pick it now and leave it alone. - Display name — the name the player sees, for example
Juan. Change this whenever you like. - Scroll to Expressions (key -> stage sprite) and press + Add expression. A row appears with the
key
base. Drag a sprite into the field next to it.
base is the default expression: when a block does not say which expression to use, this is the one that
shows. One expression is enough to finish this page. Add happy and sad later.
Note Any sprite will do for now — the package ships placeholder art in
Sprites/. Nothing here cares what the picture is.
Full detail: Characters.
5. Write two lines
Go to the Story tab. Three panels:
- Left: the Add blocks palette. Every instruction you can put in a node, grouped by category.
- Middle: the graph canvas. Your nodes. There is one already, from step 2.
- Right: the node inspector. The selected node’s blocks, in the order they run.
Click the node in the graph to select it. Now build the node, top to bottom.
- In the palette, under Scene, click Backdrop. It is appended to the node. In the inspector, set Background sprite to a sprite.
- In the palette, under Scene, click Show character. Set Character to Juan. Leave the rest.
- In the palette, under Dialogue, click Dialogue. In the inspector, set Speaker to Juan and
type into Line text:
Hello. Are you lost? - Click Dialogue again. Speaker Juan. Line text:
You should not be out here after dark.
That is the whole node: a backdrop, a character, and two lines. Blocks run top to bottom, and a Dialogue block stops and waits for the player — that is what makes them two separate lines instead of one wall of text.
Clicking a block in the palette appends it to the end. To insert it somewhere in the middle instead, drag it onto the block list at the position you want.

Note Leave the Speaker field empty and the line is narration — no name, no portrait. That is how you write “The room went quiet.”
Full detail: Dialogue and the stage and Blocks reference.
6. Add a choice
Right-click an empty spot on the graph canvas:
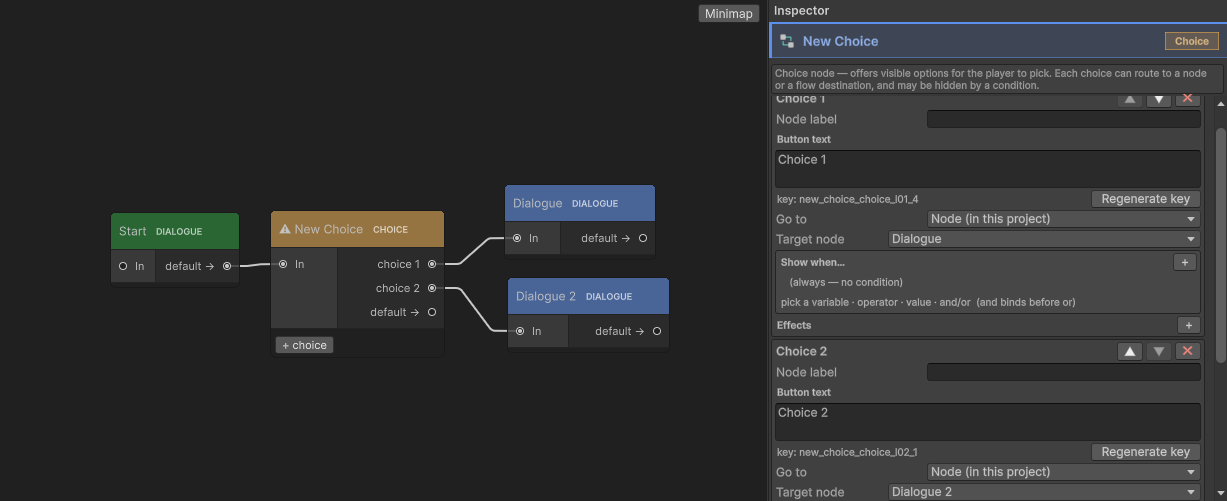
Create > Choice NodeA Choice node shows the player some options and goes wherever the one they picked points.
Wire the first node to it. Drag from the output port on the right edge of your Dialogue node to the input port on the left edge of the Choice node. Now the two lines play, and then the choice appears.
Give it two options. Select the Choice node. In the inspector, under Choices, press + choice twice. For each one:
- Button text — what the player reads on the button. Type
Runin the first andTalk to himin the second. - The target — where that option goes. Leave it empty for now; you will point it at a node in a moment.
Give the options somewhere to go. Right-click the canvas twice more and create two Dialogue nodes.
Put a Dialogue block in each with a different line (You run. / You stay.). Then go back to the Choice
node and set each option’s target to one of them — either from the option’s target field, or by dragging
from that option’s port on the graph to the node.
Below the options there is Default next (no choice available). That is where the node goes if every option is hidden by a condition. Neither of your options has a condition, so it will not fire today, but setting it is a good habit — it is what stops a story from dead-ending.
Full detail: Choices and decisions.
7. Press Play
Save the scene, then press Play.
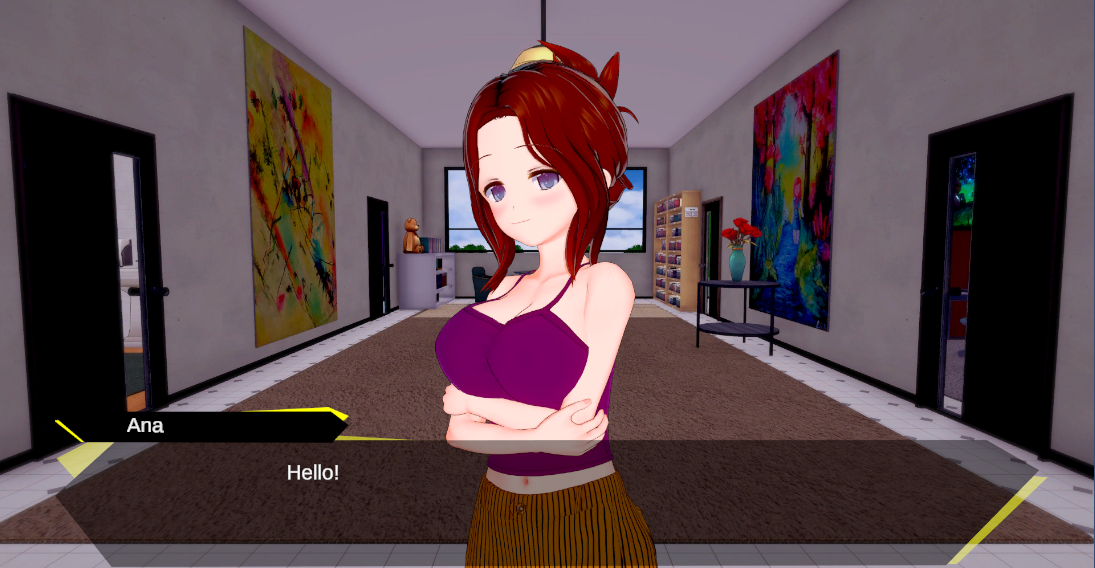
The main menu comes up. Press Start. Your backdrop appears, Juan appears, and he says his first line. Click, or press Space, to advance. After the second line the two buttons appear. Click one, and you land in the node it points at.
That is a visual novel.
Advance is Space, Enter or left click. Escape or right click opens the game menu, where Save and Load already work. See Input and controls.
8. Two things to do before you go further
Preview a node without entering Play Mode
Waiting for Play Mode to see one line gets old fast.
Tools > Beasty VN > Dialogue PreviewThis plays a node — backdrop, characters, props, dialogue box — inside an editor window, without entering Play Mode. You can fast-forward to a specific block, so you can look at the exact moment you are working on. It touches nothing in your scene and saves nothing. See Dialogue preview.
Validate
In the top bar of the Beasty VN window, press Validate.
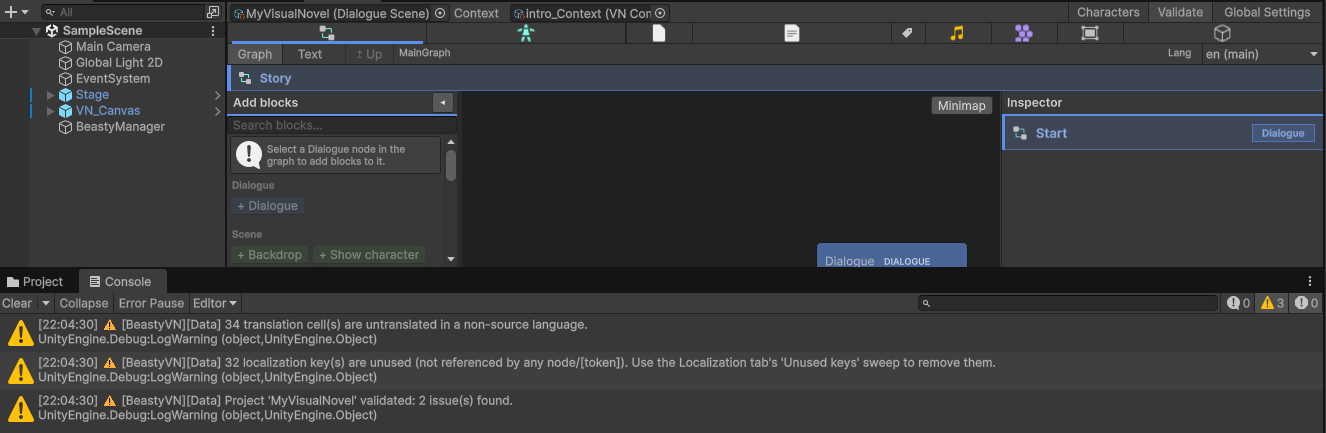
The validator walks the root graph and every subgraph and reports dangling references: a line spoken by a character id that no longer exists, a condition on a variable you deleted, a dictionary token that is not defined. It costs a second. Run it before your players find the problem for you. See Validation and ids.
Where to go next
Three directions, pick whichever your game needs.
Add a room. Let the player leave the novel, walk around, click on a door and come back. Put a Go to FreeRoam block at the end of a node and read Free roam rooms.
Add a variable. Give the player something the story remembers. Define it in the Variables tab, set it with a Set variable block, and put a condition on a choice so it only appears when the variable says so. Read Variables and conditions.
Write the same scene as text. In the Story tab, flip the Graph / Text toggle. Your scene is there, as a script:
label intro:
    backdrop bedroom
    show juan base
    juan "Hello. Are you lost?"
    juan "You should not be out here after dark."
    jump cruce

choice cruce:
    choice "Run" -> ran
    choice "Talk to him" -> stayed
The words after label and choice are node names, so yours will show whatever your nodes are called.
Once you can read that, you can write dialogue as fast as you can type. Read
The text script.
See also
- Core concepts — read this next
- Editor tour
- The story graph
- Blocks reference
- Troubleshooting