

beasty-visual-novel / production / localization.md
Localization
Translate a game that is already written. This page covers the two translation tables, adding and deleting languages, how the editor tells you which translations went out of date, importing and exporting spreadsheets, localizing the interface, and switching language while the game runs.
The two tables
There are exactly two LocalizationTable assets in play, and they never mix.

| Table | Where it lives | What it holds |
|---|---|---|
| The story table | On the VNContext (localization), so every DialogueScene that shares the context shares it | Dialogue lines, choice labels, talk-menu labels, item and quest text — everything the story references by key |
| The global UI table | VNSettings.uiLocalization, in Resources | Menus, HUD, buttons, confirmation dialogs — the interface |
Edit both in the Localization tab of the Beasty VN window (Tools > Beasty VN > Editor). The
Story / UI (global) toggle at the top switches between them. If a project has no table yet, the tab
offers Create & Assign New Table.
The global UI table also heals itself: every scene setup and every Auto-wire / Repair pass checks it. A table that exists but is unassigned is adopted and re-wired automatically, and only when none exists is a fresh one created beside the VNSettings asset, pre-seeded with the built-in UI strings. The check is merge-only — custom keys and every edited translation are never touched. What it cannot do is resurrect a deleted table’s own content: regeneration restores the built-in strings, not your keys and translations.
Nodes never store raw text. A dialogue line stores a KEY, and the table stores the text for that key in every language. That is why translating is only ever “add a column”.
Languages, and which one is the source
A table’s languages list is an ordered list of language codes, and index 0 is the source language — the
one you write the game in. Everything else is a translation of it.
A language is never added to one table alone. Adding, deleting, restoring and renaming all apply to the story
table AND the global UI table at once, and they also update the context’s supported-languages list and
VNSettings.defaultLanguage. That is why the in-game language dropdown always offers exactly the languages
the story has.
Adding a language

+ Add Language opens a dropdown of 15 curated languages — English, Spanish, French, German, Italian, Portuguese, Dutch, Russian, Japanese, Korean, Chinese (Simplified), Chinese (Traditional), Polish, Turkish, Arabic — plus Custom… for a hand-typed code. The curated names are the same ones the in-game language dropdown shows, so a language created here is never a bare code to the player. Languages already in the table appear greyed out.
Adding a curated language pre-fills the built-in UI strings in that language: menus, HUD, dialogs and the save/load screens arrive translated without you touching a single key. Only your own story text is left to translate. A custom code gets an empty column, as you would expect. (Seed defaults, in the Localization ▸ UI toolbar, re-fills those built-in strings for every curated language already in the table, without overwriting what you have written.)
A new language is appended at the end, never inserted at the front, so index 0 stays the source.
Note The curated names are in English on purpose. The native names (Russian, Japanese, Arabic…) need glyphs the default TMP font atlas does not carry, so they would render as empty boxes in the very dropdown the player uses to pick a language. If your game ships a font that covers those scripts, you are free to rename them.
Deleting a language, and getting it back
Deleting always asks for confirmation first, and it does not destroy the texts: the language moves to a Deleted languages trash under the language list. From there you can:
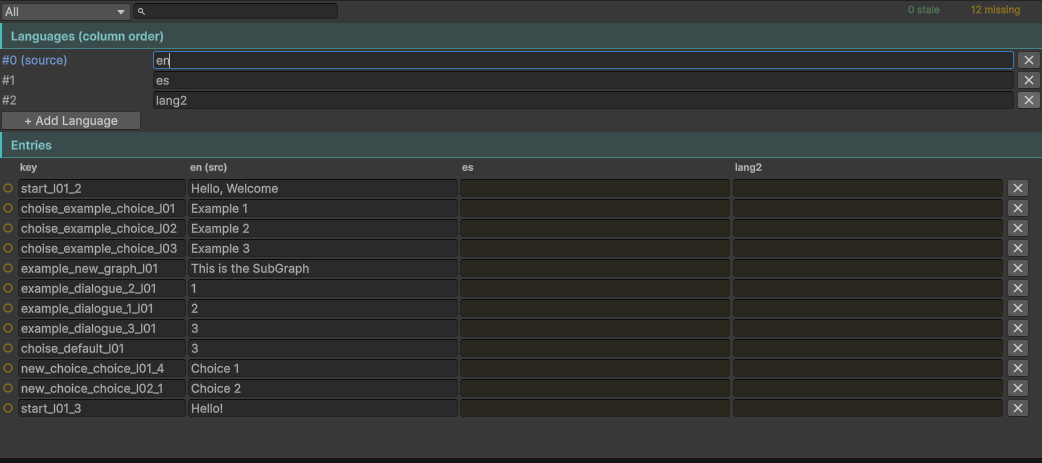
- Restore it — the column comes back with every translation it had.
- Delete permanently — a second confirmation warns that the texts are unrecoverable once the assets are saved.
Adding a language whose code is sitting in the trash restores it instead of creating an empty duplicate; the
dropdown labels it (restore) so you know which one you are getting.
Deleting the main language (index 0) is allowed, and the confirmation names its successor: the next
visible language is promoted, its texts become the source column, and the Story window, the supported-
languages list and defaultLanguage all follow. The last remaining language cannot be deleted.
Renaming happens on the language row: type the new code and press Enter, and the code is rewritten
in both tables, in the trash records, in the supported list and in defaultLanguage. The cells are
positional, so renaming keeps every text. Renaming onto a code that already exists is refused — it would
silently merge two languages.
Staleness: knowing which translations went out of date
This is the part that matters on a real production.
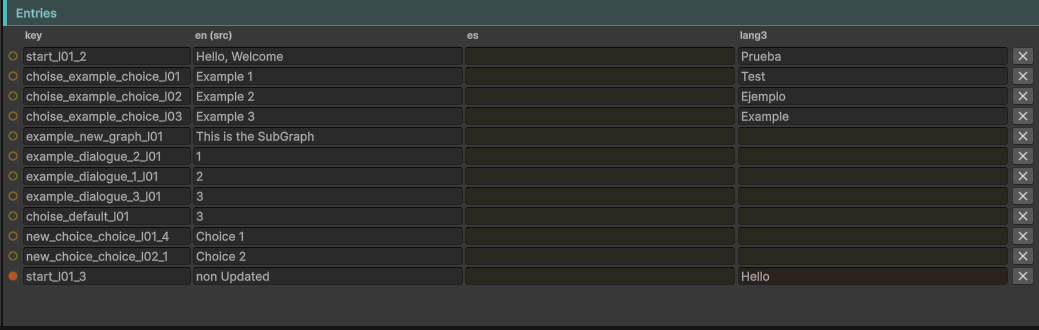
Every translated cell records a fingerprint of the source text it was translated from. When you later edit the English line, the fingerprint no longer matches, and the cell that was translated from the old wording is flagged. You do not have to remember what you changed; the table remembers for you.
Each cell is in one of four states:
| State | Meaning |
|---|---|
Source | The source-language column (index 0). It is the reference, so it is never missing or stale. |
Missing | No text has been entered for this language yet. |
Stale | Translated once, but the source text has changed since. It needs review. |
Translated | Translated, and up to date with the current source text. |
The grid shows the state of every cell as a badge, and the filter bar can narrow the grid to Missing or stale, Missing or Stale only. The validator also reports the totals (see Validation and ids).
Note A table written before fingerprints existed is backfilled once, on open: existing translations are assumed in sync rather than flooding you with false “stale” flags.
Working in the grid
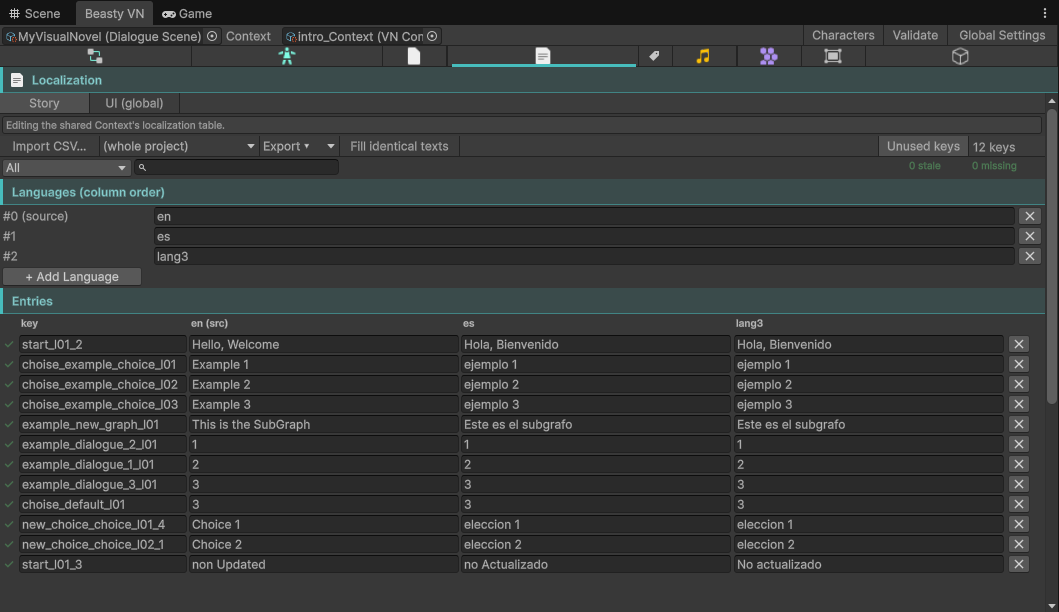
- + Add Language — appends a language column, from the curated dropdown or a custom code (above).
- + Add Key — adds a key by hand. You rarely need this: the block editor generates a key for every line you write.
- Unused keys — a toggle that lists keys the table holds but no dialogue line, choice or
[token]references any more, with a Remove N unused key(s) sweep. Deleting story content leaves its keys behind; this is how you clear them. - Fill identical texts — the translation-memory button. Lines whose source text is EXACTLY identical share their translations: an empty cell is filled from an already-translated twin. Translate a repeated line like “Yes” once and fill the rest. It never overwrites a cell that already has text.
Import and export
The table travels as a spreadsheet file, so a translator never needs Unity. It exports and imports delimited text (CSV or TSV, RFC 4180: quotes double up, and any field containing the delimiter, a quote or a newline is quoted). Punctuation inside dialogue is never a problem.
The first column is key. The columns after it are the languages, in order. Export also writes one
metadata column per non-source language, #status.<code>, holding ok, stale, missing or source, so a
translator working in a spreadsheet can see what needs attention. Columns whose header starts with # are
metadata and are ignored on import.
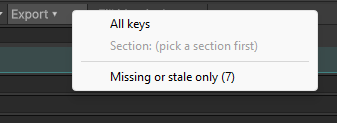
Export (the Export dropdown in the Localization toolbar) offers three scopes:
| Scope | What it writes |
|---|---|
| All keys | The whole table. |
Section: <graph> | Only the keys referenced by the graph selected in the section dropdown. Use it to hand one chapter to one translator. |
| Missing or stale only (N) | Only the cells that need work. This is the one you will use most. |
Export uses the running machine’s list separator (a comma in en-US, a semicolon in most European locales), so the file opens straight into columns when you double-click it, and it is written as UTF-8 with a BOM, so accents survive Excel.
Import (Import CSV...) auto-detects the delimiter from the header row — tab, comma or semicolon — and
also tolerates a leading sep= line from an older file. So a file exported anywhere, or a hand-made
comma/semicolon CSV, imports cleanly.
Two things import does deliberately:
- A file with no header row is rejected and nothing is written. Its first line is real data, and reading it as the header would silently eat it.
- Re-importing a full table does not clear your stale flags: a translation whose text did not change keeps its recorded fingerprint. Only a translation whose text actually changed is stamped fresh against the current source.
Localizing the interface
Story text localizes itself: a node stores a key, and the game looks up the active language’s text when
the line is shown. Interface text has to be attached
to the label that shows it, and that attachment is the VNLocalizedText component: it holds one UI-table key
and rewrites its TMP label whenever the active language changes. A label without it shows whatever text it was
authored with, forever.
Bake Localized UI Labels

Bake scene labels in the Localization ▸ UI toolbar (also Tools > Beasty VN > Setup > Bake Localized UI Labels) walks every canvas in the open scene and adds VNLocalizedText, with its key already filled in, to
every label whose text matches a UI-table value.
It writes into the source prefabs, not into the scene instances, so one bake fixes every instance in every scene at once. Only labels that are still plain instances of a non-editable prefab get the component as a scene override. Afterwards the key travels with the object: the label can be moved, renamed or restyled and it keeps localizing.
Run it once after restyling your menus, and after Build Default Menu Prefabs.
Note Matching is exact (trimmed, with
...and…treated as the same). A label whose text is your own writing and not a table value is never touched, so baking cannot rewrite your custom labels.
Wiring one label by hand
Add VNLocalizedText to the label and pick its key from the searchable picker in the inspector. Two things
the inspector does beyond picking:

- Create key from this text. If the label’s text is not in the table yet, one button mints a fresh
ui.*key from that text (Open inventory→ui.open_inventory), stores the text as the key’s source-language value, and assigns it. You never have to visit the table first. - Source text, edited in place. The key’s source-language text is editable right there. It lives in the table, so editing it flags the existing translations stale exactly as if you had edited the grid. Two buttons sync it against the TMP label on the same object: From label copies the label’s current text into the source value, To label writes the source value onto the label.
Scenes authored before all this
At boot, BeastyManager retro-fits VNLocalizedText onto any canvas label whose text matches a built-in UI
value in any language. Menus built from older prefabs — which carried their text baked into the TMP component
and could never react to a language change — follow the player’s language without being re-authored. It is a
safety net, not a replacement for baking: it runs every boot, it only covers built-in strings, and labels that
were already baked are skipped.
When the interface is stuck in one language
If the UI table’s source column (#0) is not en, every untranslated cell falls back to that language, and the
symptom is an interface that ignores the player’s choice. The Localization ▸ UI tab detects it and offers
Make English the source and fill missing defaults, which moves en back to column 0 (each text follows
its own language) and fills in the built-in defaults that were missing.

Switching language while the game runs
There is one source of truth for the active language, shared by the story and the interface, and one “language changed” event. Switch language in one place and everything re-resolves at once: the line currently on screen is re-rendered, the choices on screen are re-rendered, and an open talk menu is re-rendered. The player can change language in the middle of a line and see it change under them.
When a key has no text in the active language, the source-language text is shown instead — a blank cell falls back exactly like a missing column, so an untranslated line never renders as a raw key.
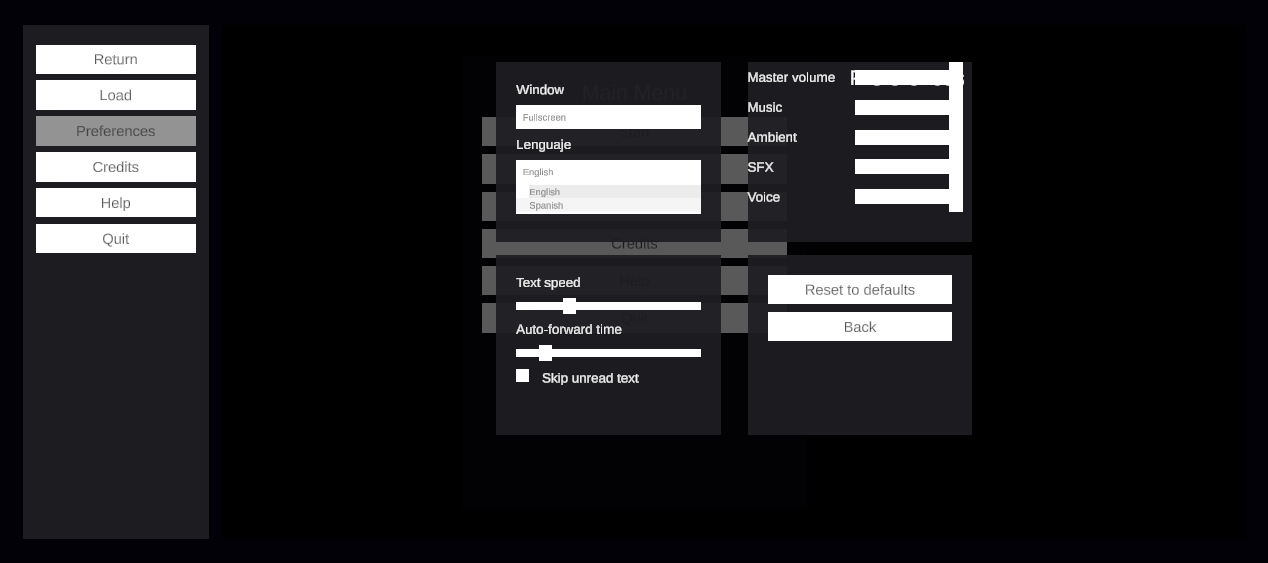
The player switches language from the language dropdown in the preferences screen. It is filled at runtime from the UI table’s visible languages, using the curated display names, and it hides itself when the game has only one language — so a single-language project shows no dead control. The choice is saved and wins over everything at the next boot.
Which language the game starts in
At boot, in this order:
- The player’s saved choice. Once the player has picked a language, it always wins.
- The operating-system language, but only if
autoDetectSystemLanguageis on in VN Settings AND the UI table actually has that language — so the game never starts in a language you have not translated. - The default language (
defaultLanguagein VN Settings).
The active language is also stored in every save, and restored with it.
The authoring language is not the game’s language
The Lang selector in the Story tab picks which language column you are TYPING into while you author. It is
an editor convenience — a translator can work directly in the node inspector instead of a spreadsheet — and it
has no effect on the language the game runs in. Setting Lang to fr does not make the game start in French;
defaultLanguage does.
The Story window follows the language list: delete, restore or rename a language and the node card previews and the Lang selector re-resolve immediately. If the language you were authoring in no longer exists, the selector falls back to the main language rather than silently showing English.
See also
- VN settings — the default language, OS auto-detect, and where the UI table is assigned.
- Validation and ids — the validator reports keys with no source text, and the missing/stale totals.
- Dictionary — player-editable
[token]text, which is a different mechanism. - Large projects — keeping a big table manageable.