

beasty-visual-novel / production / input-and-controls.md
Input and controls
Every action a visual novel needs is bound out of the box, on both of Unity’s input backends — the new Input System and the classic Input Manager. This page lists the actions and their defaults, shows where you change them, and explains how the player rebinds them.
The actions and their defaults
| Action | Primary | Secondary | Mouse |
|---|---|---|---|
| Advance | Space | Enter | Left click |
| Back | Page Up | Backspace | (mouse wheel up) |
| Re-advance | Page Down | — | (mouse wheel down) |
| Skip (hold) | Left Ctrl | Right Ctrl | — |
| Skip (toggle) | Tab | — | — |
| Auto | A | — | — |
| Menu | Escape | — | Right click |
| History | B | — | — |
| Hide UI | H | — | — |
| Quick save | F5 | — | — |
| Quick load | F9 | — | — |
| Choice 1-9 | Digits 1-9 (and numpad 1-9) | — | — |
Rolling back with the mouse wheel (up to go back, down to re-advance) and the choice keys are fixed. Every other row above is yours to change.
Rebinding in the editor
Select the BeastyManager GameObject in your scene and open the Controls section of its inspector. Each action is one row with three dropdowns: Primary, Secondary and Mouse. Pick a key from the list; an empty (—) slot means “no binding for that slot”.
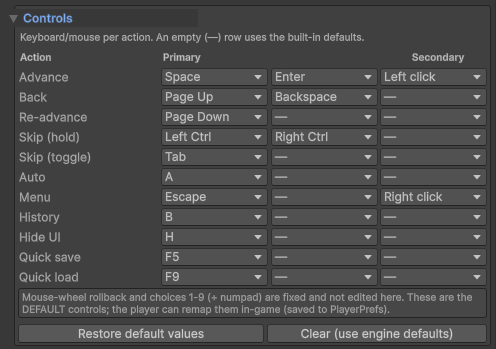
Three buttons sit under the table:
- Edit controls (load defaults) — fills the table with the shipped defaults so you can start editing.
- Restore default values — puts the table back to the defaults.
- Clear (use engine defaults) — empties the table. An empty config is not “no controls”: it means the built-in defaults apply, which are slightly richer than the friendly table can express (numpad Enter for Advance, both Ctrl keys for Skip).
Note This is a serialized configuration on the BeastyManager, not an
.inputactionsasset. There is nothing to create, nothing to assign, and nothing to keep in sync.
The two input backends
The package works with the new Input System, the classic Input Manager, or a project that has both.
You do not choose. Unity’s own Active Input Handling setting (in Edit > Project Settings > Player) picks
the layer:
- With the Input System package installed and enabled, the Input System backend registers itself at startup and handles the bindings.
- Otherwise the classic Input Manager backend reads the same bindings.
The Input System code lives in its own assembly, which Unity only compiles when the package is present. So the package compiles and runs in a project that never installed the Input System package — you are not forced to add a dependency you did not want.
Both backends read the same binding table, so the controls you map in the Controls section behave identically on either one. One consequence worth knowing: a gamepad binding has no classic Input Manager equivalent, so on that backend it is skipped — the action simply has one fewer binding rather than breaking. A project on the old backend that wants a gamepad configures it in Unity’s own Input Manager.
Rebinding by the player
The bindings above are the DEFAULTS your game ships with. The player’s own rebinds are a separate layer applied
on top of them, and they persist: they are saved to PlayerPrefs (Unity’s per-machine settings storage) and
re-applied on the next launch. A controls
screen can save, reload or clear them (SaveOverrides, LoadOverrides, ResetOverrides on the input
actions), and clearing them returns the game to your defaults.
Each backend stores its overrides under its own key, so a project that switches backend starts from your defaults again instead of trying to read the other backend’s format.
Typing suppresses every shortcut
This is the detail that saves support tickets. While the player is typing into a text field, every input
action is suppressed. Pressing b while naming their character types a b — it does not open the backlog.
Pressing a does not toggle Auto. Space does not advance the line. Choice keys return nothing.
It applies to both TextMeshPro and legacy uGUI input fields, which covers the naming prompt, the save-name field and any field you add yourself.
See also
- VN settings — text speed, auto-forward and the other preference ranges.
- UI prefabs — the preferences screen the player rebinds from.
- Saving and loading — what quick save and quick load do.